Creating custom audiences for Facebook advertising - Part 1
Creating custom audiences for Facebook Ads - Part 1


Once created, you need to insert the Pixel code shown below in the head tag of your website.


Once the Pixel is added, you can check the Pixel status to see if a pixel is active. It generally takes 20 minutes for it to be activated once installed.
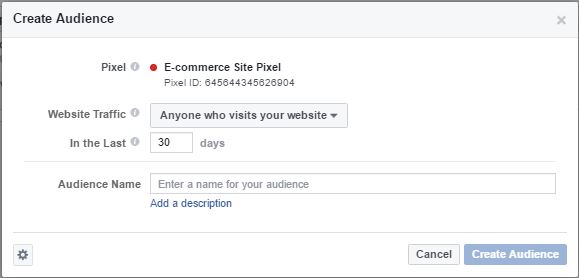
 After creating and installing the pixel in the site, you create the custom audience using this Pixel by selecting website traffic option to create the audience as follows:


So, till now we saw how to re-market to the customers who visited your website or shown interest in specific products.
In the last post, we discussed how to create ads using Facebook ads manager. We also discussed how to create a target audience for the ad. In this post, we will discuss how to customize these audiences. You may want to show an ad only to the people who visited your website, used your app, liked your page on Facebook or a part of your customer database. Facebook provides the options to customize the audiences as per the advertisers' requirements.
(1) Lookalike Audience: Lookalike audience lets you create an audience similar to one interested in your products/services. You can chose the list of people who like a page you manage or a list from your CRM database, website visitors, app users, etc. This is an efficient method to ensure you that the audience you create is similar to those who already like your page or are your customer. You can use it well for cross country ads. If you are selling a product in India and have a list of your customer, you can use it to create a lookalike audience in another country to display your ads.
Try to chose a smaller reference audience size to create the lookalike audience. Facebook recommends 10,000 to 50,000 of your best customers to ensure good results. The ad is not served to the source audience used to create the lookalikes.Below is how we create a lookalike audience from Ads Manager. In this case, we have used the source as the audience who has liked a page. Alternatively, we can use other audiences as well. It takes typically 6-24 hrs for the lookalike audience become active for use.


(2) Custom Audience from Website: You can also target those people who visited your website with ads on Facebook. This is typically used for re-marketing. If a person visited a product page on your website but didn't make the purchase, you can create a custom audience to target such leads. Or, you can create an audience for everyone who created your website in the past 30 days.
To target your website visitors on Facebook, you need to insert Facebook Pixel in your site's code. This is a piece of code which is generated as shown in the below images:


Once created, you need to insert the Pixel code shown below in the head tag of your website.

After adding the code in the website header, one needs to decide the events performed by the visitors for which you want to show the add. For eg: If you want to show an ad to a customer who added a product to the cart, you would need to copy the code from 'Add to Cart' section and paste it on the particular page outside the head section. Similarly you can copy the code for all the 9 events offered by FB and add it to your site's code.


Once the Pixel is added, you can check the Pixel status to see if a pixel is active. It generally takes 20 minutes for it to be activated once installed.


Next, FB provides multiple options to create an audience. You can simply chose to show ads to anyone who visited your website in the last 30 days and performed the action specified in the pixel embedded. Secondly, you can chose to select only those who visited specific pages on your website and target them basis the pixel. There are also options to exclude people visiting specific pages or use more conditions. Finally, you can also target those who have not visited your website in the past 6 months.


So, till now we saw how to re-market to the customers who visited your website or shown interest in specific products.
In the next post, we would check out how to target customers from your CRM list and those who use your mobile phone.


Comments
Post a Comment